Windows Operating System Version

Author Name
Joe Garcia


Artifact Name
Windows Operating System Version


Artifact Location
SOFTWARE Registry Hive


Registry Keys
SOFTWARE\Microsoft\Windows NT\CurrentVersion


Description
What version of the Windows Operating System is installed on a suspect computer is important. When Microsoft went from XP to Vista/Win7, certain artifacts were moved to new locations. This knowledge can help a Forensic Examiner/Analyst streamline their examinations. It can also help determine who the registered owner of the computer is and when the OS was installed.


Let’s look at this artifact using AccessData’s Registry Viewer:

Windows OS Version in Registry Viewer


Here we can see the following important information (Owner & ProductID redacted in image):
Install Date
Registered Organization
Registered Owner
Product Name
ProductID
CSDVersion (Version of the OS)


Registry Viewer was nice enough to parse out the Install Date, but if you are like me you like to verify your findings. To do this I used the DCode utility by Digital Detective:


Forensic Programs of Use
FTK Registry Viewer
RegRipper
DCode


轉自 http://forensicartifacts.com/2011/03/windows-operating-system-version/

Google Chrome Browser Profile (Mac OS X)

Author Name
Joe Garcia
 
Artifact Name
Google Chrome Browser Profile Folder (Mac OS X)

Artifact/Program Version
Mac OS X

Description
As part of a lot of Digital Forensics investigations, obtaining information of the user’s browsing habits is an important step.  Safari is the browser de facto on OS X & Firefox has a large user base, but what about Google’s Chrome Browser? Like Firefox before it, Chrome is steadily gaining ground in the browser market share. This post looks to point out where to find the Chrome user’s Profile folder on a Mac hard drive. Most times, the Profile will be saved as “Default”, but be on the look out for multiple profiles. Once you locate and extract the Chrome Profile folder (listed below) from your image, you will need to bring it over to a Windows forensics box so that you can use tools like ChromeAnalysis or ChromeForensics to assist you in parsing out the information stored within it. You will get the following data, which is stored in SQLite files:

History (Web, bookmarks, downloads and search terms)

Cookies

Web Logins

Archived History (Web History and search terms)

Bookmarks (This is in a non-SQLite format)

File Locations
HDD\Users\USERNAME\Library\Application Support\Google\Chrome\Default

Research Links
Get Google’s Chrome Browser HERE

Forensic Programs of Use
ChromeAnalysis from forensic-software.co.uk: http://forensic-software.co.uk/chromeanalysis.aspx

ChromeForensics by Woanware: http://www.woanware.co.uk/?page_id=70


轉自 http://forensicartifacts.com/2011/03/google-chrome-browser-profile-mac-os-x/

Skype Forensic II

登錄檔位置:
HKEY_CURRENT_USER\Software\Skype

檔案、Log位置:
C:\Documents and Settings\[Profile Name]\Application Data\Skype\[Skype User]
C:\Documents and Settings\[Profile Name]\AppData\Roaming\Skype\[Skype User]
C:\Documents and Settings\[Profile Name]\Application Data\Skype\[Skype User]\IMHistory\[User]pug.html

可使用分析軟體:
Skype Log View
Skype Parser
Skype Analyzer
SkypeAlyzer

Skype Log parser

其他研究:
大IM

資料來源:
Invisible Man

硬碟故障救星 - ddrescue

眾所周知硬碟是有壽命的,作為電腦用家,一定曾經歷過硬碟在讀取資料途中,發出怪聲後卡住無法繼續讀取的情形。這時今次介紹的ddrescue說不定可以幫上忙。


硬碟在讀取途中發出怪聲後卡住,是因為遇上壞掉的部分時,系統會一直繼續重試,以致卡住無法取得數據。ddrescue的前提則是優先救出所有健全 的數據, 它會跳過壞掉的部分,繼續讀取餘下的數據。取得所有健全數據後,才回頭到剛才跳過的部分重試,並取出健全的數據。

以上兩個步驟都無法讀取的部分,將以磁區 為單位分割後再重試。ddrescue雖是一個只可在Linux下運作的工具,但支援包括NTFS在內的大部分檔案系統,是救出Windows數據時的其中一個選擇。


Forensic wiki:

ddrescue is a raw disk imaging tool that "copies data from one file or block device to another, trying hard to rescue data in case of read errors." The application is developed as part of the GNU project and has written with UNIX/Linux in mind.

ddrescue and dd_rescue are completely different programs which share no development between them. The two projects are not related in any way except that they both attempt to enhance the standard dd tool and coincidentally chose similar names for their new programs.

From the ddrescue info pages:
GNU ddrescue is a data recovery tool. It copies data from one file or block device (hard disc, cdrom, etc) to another, trying hard to rescue data in case of read errors.

Ddrescue does not truncate the output file if not asked to. So, every time you run it on the same output file, it tries to fill in the gaps.

The basic operation of ddrescue is fully automatic. That is, you don't have to wait for an error, stop the program, read the log, run it in reverse mode, etc.

If you use the logfile feature of ddrescue, the data is rescued very efficiently (only the needed blocks are read). Also you can interrupt the rescue at any time and resume it later at the same point.

Automatic merging of backups: If you have two or more damaged copies of a file, cdrom, etc, and run ddrescue on all of them, one at a time, with the same output file, you will probably obtain a complete and error-free file. This is so because the probability of having damaged areas at the same places on different input files is very low. Using the logfile, only the needed blocks are read from the second and successive copies.

轉自 
http://www.forensicswiki.org/wiki/Ddrescue
http://www.linuxpilot.com/software/kiji/2010080701

Encoding Master :全世界的純文字亂碼都交給我

電子書的編碼問題,最容易出現在TXT純文字檔上,因為TXT並不會特別在檔案內容裡標明文字所使用的編碼,所以 軟體常常會讀出亂碼。以中文世界來說,最容易產生的就是簡體與正體中文的衝突問題,比如大家在下載電影的字幕檔時,就一定常會遇到簡體中文字幕無法正常顯示,得需要用ConvertZ或Word重新轉換文件才行。 
 
基本上,不管電子書或是其他格式文件,只要是放在網路上流通的格式,存成UTF-8還是最理想的。以電子書來說,採用UTF-8編碼的文件也會有比較高的成功率。

在中文文件裡,最常出現的編碼是GB、Big-5以及UTF-16,前兩種分別適用於簡體與繁體中文就不說了,UTF-16則是最容易讓人誤會。很 多文書處理軟體儲存檔案時,會詢問使用者編碼格式,不少使用者會捨UTF-8而就UTF-16,以為數字大就比較好,其實並非如此。就相容性來 說,UTF-8是很多網路服務、協議都得支援的格式,UTF-16不管在數字上的涵義或者是實際的使用範圍,之於UTF-8都沒有「大於」的關係。

所以了,要怎麼把文件轉成UTF-8呢?用最簡單的記事本就行了。但是遇到大量文件要處理時,靠專門的程式比較快,筆者覺得最好用的非「Encoding Master」莫屬。

▲ Encoding Master會自動偵測原文編碼, 預設的輸出格式就是UTF-8,所以你幾乎不需要做任何設置,等於是一鍵轉檔。

▲ 一次有大量的文字檔要轉,就直接選擇目錄吧。

Encoding Master跨Mac跟PC兩種平台,它幾乎可以轉換這世界上所有登記在案、流通廣泛的文字格式,重點是會自動幫你偵測原始的文件格式,所以這個軟體也可 以用來看亂碼,如果你有UTF-8的檔案仍然是亂碼,Encoding Master也能幫你修復,遇到根本就不知道是什麼的編碼時,一樣就交給它來辨識吧!除非是火星文。

▲ 如果是簡繁互轉的話,問題倒不是在編碼,要靠Word或ConvertZ才能真正轉換字元。

▲ MPlayer OSX Extended在開字幕檔時就可以先選編碼,懶得轉字幕就用這套播吧。


轉自  T客邦

What is PyFlag?

PyFlag原是由澳洲國防部設計,之後被以GPL License(Free Software Foundation, 2007)模式釋出為自由軟體。原始設計是做為以資料庫與分析工具所架構的數位鑑識工具,後來又再加上了先進的網路鑑識的能力。它具有以下的特性:
  1. PyFlag是一種圖形界面的鑑識軟體,它可以以分析比對大容量的檔案、和log檔。
  2. PyFlag有強大的功能,包括載入許多不同類型的log檔案、執行磁碟與映象檔的鑑識分析。Pyflag也能藉由tcpdump快速有效率地進行網路流量分析。
  3. 因為PyFlag是在web之上使用的軟體,它能夠部署於Server中並由多位user同時共用。資料是載入到case中以便與資訊隔離開來。
  4. PyFlag基於GPL授權,可供任何人使用、修改與改良。
Feature List

  1. Network Forensics -PyFlag能分析TCPDump的網路記錄格式,支援不同類型的通訊協定。
  2. Log Analysis - PyFlag擁有強大的log分析能力。支援許多log格式及提供查詢log檔案的強大系統。
  3. Disk Forensics - PyFlag具備強力的分析鑑識硬碟images能力,支援多數檔案系統。也擁有Carve (比對檔案中,出現某一特徵的程序)的能力。
  4. Memory Forensic - PyFlag利用Volatility Framework可支援記憶體鑑識的功能。
The general PyFlag architecture:

PyFlag的主要元件如下:


1.IO Sources:
為了提供壓縮,或在原始image中儲存案件有關的meta-data,通常image除了dump(有時稱為dd格式)外還會以其他格式儲存。鑑識的資料通常來自不同的格式。透過IO Source Drivers,PyFlag可支援多種不同的image格式。IO子系統使用不同的driver,將資料以統一格式呈現,提供了一個標準的介面將image呈現給PyFlag。

在我們使用PyFlag分析image前,我們必須定義一個IO Source。一個IOSource僅僅是收集資訊以獲取原始image的數據資料。
例如,為了讀取一組Encase類型檔案,我們需知道使用Encase的Driver。透過讀取partition table來瞭解檔案系統是從那裡開始。這組必要的資訊稱為一個「IO Source」,而我們也可以自行將其命名。

一些常用IO Source drivers使用包括EWF(Expert Witness Forensic file format, Kloet,2007)這種支援業界目擊證據文件格式,以及標準IO Source也增加了可以直接取用dd program的原始image檔的能力。這提取可以把容量非常大的PCAP檔案以EWF格式儲存,以利壓縮、hash認證和檔案metadata等功能的使用。

2. The Virtual File System:

檔案系統是數位鑑識的核心,因此Virtual File System(VFS)是PyFlag的核心。PyFlag使用源自Unix的觀念是,“所有的東西都是檔案”。VFS是一個抽象的檔案系統。主要功能是向用戶提供信息。在VFS中的檔案不一定存在於image中,但所呈現信息已經由VFS推導出來。VFS本身只是儲存inode和檔案名稱的關係。

VFS基本上是一個樹狀結構,把PyFlag所有的物件在裡頭呈現。VFS是模仿真正的檔案系統,物件被稱為inode。VFS inode是個字串,它可以描述出這個物件如何獲得,物件相關的路徑、名稱等。這種途徑把inode在VFS下安排成一個目錄結構。內部的物件以inode的ID呈現,這種用法常見於一般工具中。PyFlag採用的新技術是可以把取自Data的來龍去脈以inode string來呈現。這種模式讓使用者可以很方便地檢視每個推論來自何處。

Virtual File System(VFS)提供了三個主要功能:

1. 開啓檔案
2. 在VFS中建立新檔案
3. 在VFS瀏覽檔案結構(檔案名稱和目錄)。

The File System Loader:

新建一個case後,PyFlag VFS是空的。我們必需先塞入原始資料,這便是由File System Loader的工作。

透過IO Source把imgaes載入後。File System Loader會檢查檔案系統的位置,並發掘所有在其中的檔案。負責把調查的檔案系統中所找到的檔案列表填入VFS的inode中。File System Loader是一個特殊的模組,它可以從一個實際的檔案系統(如NTFS或ext2)來處理和填入VFS inode。也能建立虛擬inodes來呈現抽象物件。

File System Loader有很多種,大致上可以分為幾種類型:

1. sleuthkit的文件系統驅動程序:
   這類drivers使用Brian Carrier's Sleuthkit的程式讀取許多種類型的檔案系統,如NTFS、FAT、ext2、ext3、ffs等。
2. Mounted File System Driver:
   這個drver只能與已掛載的IO Source一起運作,而它是在一個給定的目錄下,來記錄所發現的文件和目錄之用。
3. PCAP Filesystem:
   這個虛擬的檔案系統提供了存取PCAP檔案的能力,讓PyFlag能從事網路鑑識。

例如:PCAP FileSystem Loader在VFS中呈現代表的TCP Stream的節點,而記憶體鑑識Loader把porcess IDs和memory structure在VFS呈現。每種filesystem loader把它的inodes用一個特定的掛載點載入到VFS中。這讓許多不同的IO Source和filesystem可以同在VFS中呈現。藉由這些source產生VFS的inodes,應用程序整個一起呈現共同比對。

Scanners:

VFS是PyFlag的核心,它提供inode的存儲場所。而我們可以使用各種不同的VFS File Drivers開啓這些inode。File System可以從IO Source匯入到VFS。但File System Loader不是將檔案系統匯入VFS的唯一方式。我們也可以用掃描的方式來完成這個動作。

掃描是指使用一個或多個scanner來檢查某個目錄的過程。scanner是一種能夠細察與蒐集檔案資訊的模組元件。這過程中可能又某些檔案會被新增至VFS中(可再次掃描)。

掃描一組檔案可以從網頁瀏覽檔案系統的頁面開始,或直接從Load Data的選單進行。PyFlag有許多不同的Scanner。Scanner是一種小型的、專門為了從檔案系統中搜索檔案及資訊所建立的程式碼。例如,Zip file Scanner,旨在搜尋所有壓縮文件,並創建VFS的inode來表示zip檔的內容。

每次Scanner創建一個新的VFS檔案,便會使用一整套完整的Scanner去動作。假設pst檔案Scanner發現了一個pst檔案,從而建立新的VFS inode處理每一封電子郵件發現的附件。然後Zip Scanner,可以掃描發現其中一個附件是一個壓縮檔,從而建立了一套VFS的inode代表壓縮檔的內容。然後Virus Scanner發現一個可能這些文件中的某一個檔案是病毒。

The GUI and Table widget:

GUI提供了一個能檢視Scanner所掃瞄成果和使用VFS的界面。PyFlag最強大的工具集是table viewer。這個工具允許搜索極其複雜的數據。下圖顯示了一個典型的使用表的部件,儘管它是用在許多地方在PyFlag。

Scripting and automation:

PyFlag擁有強大的GUI快速導覽鑑識分析結果。但在任何硬體下,鑑識工作是一個緩慢的過程。硬碟image大小目前發展呈指數型增加,許多鑑識工作需要越來越多時間去進行。PyFlag會將鑑識分析結果cache起來,讓鑑識分析工作只需要進行一次。之後從cache中讀取操作起來會快上許多。

PyFlag的優點之一是使用者界面(UI)。換句話說,使用者如何與軟件交互,可以方便地改變而不用改變主要的程式碼。這讓使用者能擁有多種不同於GUI界面的選項。

命令行界面(CLI)一直是Unix的核心概念。雖然大多數新用戶擔心不懂得如何使用CLI,聲稱這是不直覺式、比GUI更難使用。然而CLI仍不被遺忘,原因就是CLI是更強大。在某些情況下,它允許批次或使用Script方式處理工作。PyFlag允許用戶互換任何模式來操作,因此,使用者如果不熟悉CLI,仍然可以使用GUI。

Network Frensics:

在數位鑑識調查中最有價值的證據之一是網絡所擷取的資訊。網絡流量可以呈現了豐富的價值和安全/管理的價值訊息。可惜一般被設計來分析網絡流量的工具(例如:Ethereal),只能調試網路問題或解剖通訊協議。但在鑑識調查中,高層次訊信息如FTP、Email…等社交網路才是重點。

模組目的是提供高層次的分析資料,同時提供足夠的信息來查明準確掌握每一塊數據的來源。例如,當瀏覽聊天訊息時,我們可以精確地看到每個聊天訊息的封包。

多層次地進行遞歸分析數據是PyFlag架構的優點之一,它可以發掘檔案被封裝在其他檔案中。這種方法是應用在分析網路通訊協議上最是理想,一般高層協議是架構在底層通訊協議之上。

PyFlag通常採取以下步驟來剖析網絡流量:

1.對PCAP檔案進行分析和並從中擷取封包。
2.將這些封包在不同低層通訊協議中分析,如以太網,IP,TCP或UDP。
3.使用TCP stream reassembler將有關TCP封包收集到stream中。Reassembler思索封包重送並按順序排序。
4.所產生的Stream用高層通訊協議的解析器(如:HTTP, IRC, MSN Chat)剖析。

The PCAP Filesystem

我們首先載入一個IO Source並將其命名,把PCAP檔案載入到PyFlag。然後選擇PCAPFS檔案系統。PCAP檔案系統,掃描IO Source並把封包建立索引。然後在VFS建立一個獨立檔案稱為rawdata。該檔案代表著原始封包資料。

The Network Scanners

初始的VFS只有一個檔案,network scanner負責填入VFS的新檔案。以下是一些重要的network scanner:

1.Steam Reassembler Scanner

Steam Reassembler Scanner將TCP封包分類到個別的stream。相對應的VFS Driver就可以使stream資料像個一般檔案使用。

2.HTTP Scanner

掃描儀的HTTP Scanner管理已重組的Stream並把曾造訪過的不同的網址分類。然後為HTTP下載的物件內容建立VFS的inode。

3.POP/SMTP Scanners

在POP scanner管理POP stream並辨識已傳送的email。依靠RFC2822 scanner的幫助,這個scanner可以為傳送的電子郵件中的附件建立VFS的stream。

4.MSN/IRC Scanners

記錄所有聊天信息,並讓它們顯示成便於檢索的格式。MSN檔案傳輸,也可以被進一步地掃描進VFS中。


轉自:http://teacher-rob.blogspot.com/2009/09/pyflag.html
參考:http://www.oschina.net/p/pyflag

Apple Safari Browser

Safari is a web browser developed by Apple and is included as part of the Apple Macintosh OS X operating system.  It has been the default browser on all Apple computers since Mac OS X version 10.3 Panther and its first public release was in 2003.  Safari is currently at major version 5 released in June 2010.
In June 2007 Apple released a version of Safari for Microsoft Windows operating systems.  The version of Safari at this time was version 3.  Windows versions have been updated in parallel with Mac OS X versions ever since and are also at the time of writing at version 5.
As of 2011, Safari is the fourth most widely used browser in the US, following Internet Explorer, Mozilla Firefox, and Google Chrome, respectively [1] .
Forensic Analysis of Safari
NetAnalysis currently supports the analysis of all versions of Safari.  Safari runs on Microsoft Windows and Apple Macintosh OS X operating systems.  The data created by Safari is file based and the structure of the data it creates is similar between operating systems.
Safari Browser v3 - 5
Safari, like all web browsers, aggressively prompts the user to update to the latest version to incorporate new security patches.  This means that you are likely to find the most recent version on computers currently in use, which at the time of writing is Version 5.
Internet History and Cache data is stored within each users profile, the exact location will vary depending on the operating system in use. 
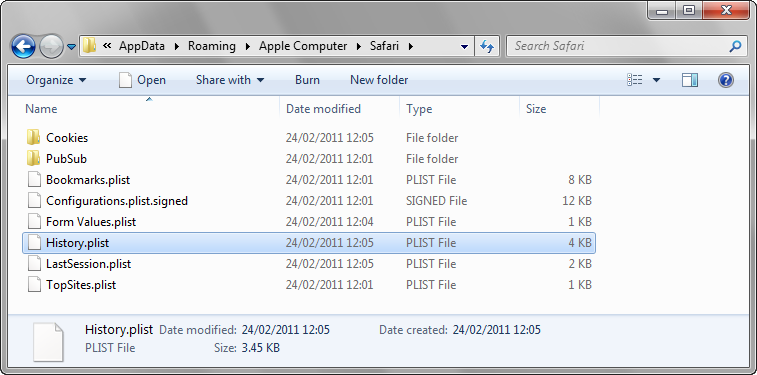
Safari stores Internet history records within an Apple property list file entitled history.plist (as shown in Figure 1).  Property list files have the file extension .plist and therefore are often referred to as plist files.  Plist files may be in either an XML format or a binary format.  For earlier versions of Safari (both Windows and Macintosh variants) the history.plist file was in the XML format.  Later and current versions utilise the binary plist format.  NetAnalysis parses both the XML and binary formatted history plist files.

Apple History Folder
Figure 1
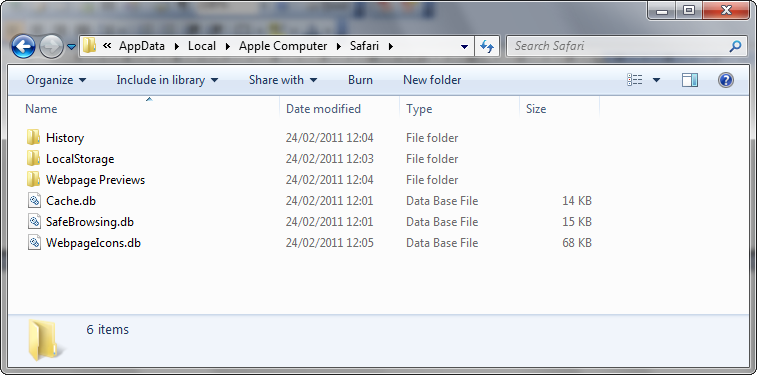
Safari versions 3 to 5 store the cache in SQLite 3 database files entitled cache.db (as shown in Figure 2).  Earlier versions of Safari stored cache in files that had the file extension .cache.  These files are not currently supported.
Apple Cache Folder
Figure 2
Stage 1 - Recovery of Live Safari Data
To process and examine Safari live Internet history and cache with NetAnalysis, the following methodology should be used.  In the first instance, it is important to obtain the live data still resident within the file system (web pages can only be rebuilt from live cache data).
This can be done in either of the following three ways:
  1. Export all of the data (preferably in the original folder structure) utilising a mainstream forensic tool
  2. Mount the image using a forensic image tool
  3. Access the original disk via a write protection device
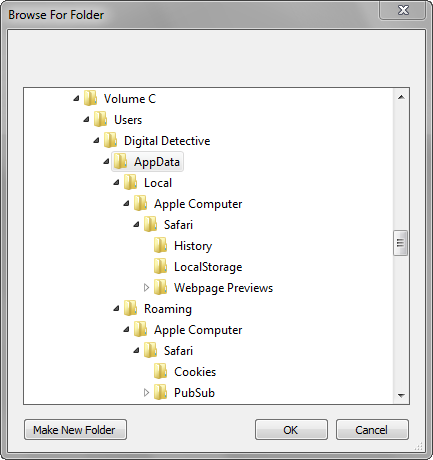
Once the data has been extracted to an export folder, open NetAnalysis and select File >> Open All History From Folder.  Select the folder containing your exported Safari data.
BrowseForFolder
Figure 3
Note
Please be aware that NetAnalysis will attempt to identify and import any browser related files.  If you only wish to process one specific browser type, only select the folder containing the file you wish to process, or open a specific file using File >> Open History.
Stage 2 - Recovery of Deleted Safari Data
HstEx is a Windows-based, advanced professional forensic data recovery solution designed to recover deleted browser artefacts and Internet history from a number of different source evidence types.  HstEx supports all of the major forensic image formats. 
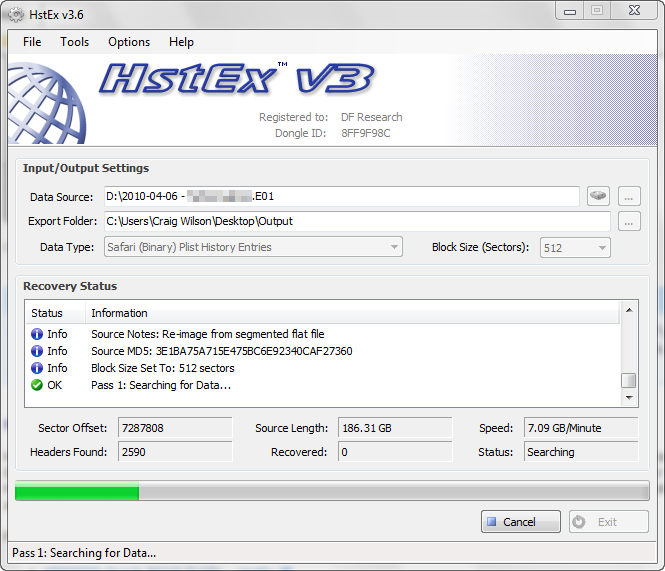
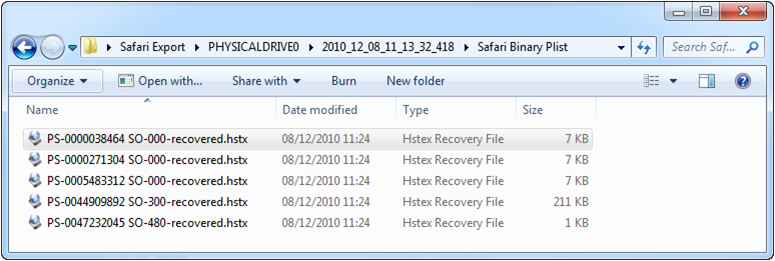
HstEx currently supports the recovery of Safari XML and Binary plist data.  It cannot at the moment recover cache records (research and development is currently being conducted).  Figure 4 shows HstEx processing
HstEx Processing Apple
Figure 4
Please see the following link for information on using HstEx to recover browser data:
Please ensure you select the correct Data Type prior to processing.  Safari v5 stores history data in binary plist files.  When HstEx has finished processing, it will open a window similar to the one shown in Figure 5.  These files can now be imported into NetAnalysis by either selecting File >> Open History and selecting all of the files, or select File >> Open All History From Folder and selecting the root recovery folder. 
HstexAppleOutput
Figure 5
Default Folder Locations
Apple Safari data can be found in the following default folder locations:
Microsoft Windows XP
  
Microsoft Windows XP (History)
\Documents and Settings\<user>\Application Data\ Apple Computer\Safari
Microsoft Windows XP (Cache)
\Documents and Settings\<user>\Local Settings\Application Data\ Apple Computer\Safari
Microsoft Windows Vista / Window 7
  
Microsoft Windows  Vista / Windows 7 (History)
\Users\<user>\AppData\Roaming\Apple Computer\Safari
Microsoft Windows Vista / Windows 7 (Cache)
\Users\<user>\ AppData\Local\ Apple Computer\Safari
Apple Macintosh OSX 10.6
Apple Macintosh OSX 10.6 (History)
/Users/<user>/Library/Safari
Apple Macintosh OSX 10.6 (Cache)
/Users/<user>/Library/Caches/com.apple.Safari
Further Reading


woanware - Forensics Tools

DFF - Digital Forensics Framework

Dff.jpg

 Introduction

From Digital Forensics Framework

Jump to: navigation, search
DFF, standing for Digital Forensics Framework, is a project dedicated to digital forensics. Written in Python and C++, it is cross-platform, highly modular and customizable. The graphical user interface is developed with PyQt. Interface between Python and C++ is achieved thanks to Swig

The framework's purpose is to offer a modular digital forensic environment to IT Managers, IT Security Managers and law enforcements, capable of analysing, correlating and extracting suspicious traces and data from files. These files can come from data acquisition on digital media, as hard disk drives, RAM memory or cell phones, or by capturing network frames in order to analyse what data were passing through the network. It can also be used to recover deleted data. 

The Open Source version of DFF has been released under the terms of the free license GPL version 2

DFF is divided into three different software layers, which communicate together through a modular Application Programming Interface (API) :
  • The core layer.
  • User interfaces (GUIs).
  • Modules.

Core layer

The first layer can be seen as the kernel of the application. It is used to load and run plugins. Plugins execution is automatic as far as the core layer is designed to "know" which plugin must be launch when it is required. This layer also offer a way for plugins for to create a hierarchy of analyzed data : each of them becomes a standard node within a tree. 

The memory space where these nodes are created is called a Virtual File System (VFS). Each node can be generated by a different plugin and having specific aatributes. This mechanism allow the kernel to generate reports by correlating all data coming from plugins, but by remaining independent from the plugins themselves. Even if a plugin crashes, once nodes are created, the kernel will be able to exploit them. As far as modules are designed to be used in forensic analysis, they also treat unallocated and hidden data.

Modules

The second layer is composed of the plugins and modules we evoked in the previous paragraph. Each of them are designed to analyze one specific type of data, as RAM memory, file systems or network frames for examples. They create nodes into the kernel's virtual file system, and according to the type of data, generate some useful informations such as time indications or meta-data extraction.

GUI

The third layer is composed of the user interface (UI). This layer is used to select the source of data the investigator wants to analyze, as a hard disk dump for example. Once the analysis is done, it is possible to applicate accurate filters to only let appear some specific kind of data, such as deleted files, time indications, etc. It then becomes possible to generate reports with very precise informations on a particular event which occur on the analyzed system. Binary data, such as meta-data structures, can be visualized within an hexadecimal viewer.
For now, three main user interfaces available :
  • The Qt Gui interface.
  • The dff shell (command line).
  • A python shell integrated to the framework.


轉自 
http://wiki.digital-forensic.org/index.php/Introduction
http://www.digital-forensic.org/digital-forensics-framework/download/

Volatile Link: Volatility Documentation

Let me begin by thanking everyone for their offers to assist with the upcoming 1.4 release,  it’s great to see the growing excitement from the Volatility Community.  On a related note, I recently received a pointer to a blog that has been discussing Volatility usage:

轉自 http://volatility.tumblr.com/post/1690892130/volatile-link-volatility-documentation

Regripper - New Plugins from Harlan

Harlan submitted 4 new plugins, now included in the most current download (RegRipper030911.zip) on the download page.  The plugins in brief are;


notify.pl – updated output format to sort entries based on LastWrite time
renocide.pl -Plugin to assist in the detection of malware per MMPC
init_dlls.pl – Plugin to assist in the detection of malware per Mark Russinovich’s blog post
samparse.pl - Parse the SAM hive file for user/group membership info

Within the zipped RegRipper folder, these new plugins are located under RegRipper030911 > Additional Plugins  > Harlan Carvey

There are few resources of forensic software, used by pretty much every examiner on the planet, that you can get for free, which is also constantly updated by users of RegRipper and Harlan.   Although I said mentioned that RegRipper is “free“, it really isn’t totally free, as if users of RegRipper can contribute anything, no matter how little, it will benefit everyone that uses the program.   Whether by writing plugins (or suggesting a plugin to be written), giving feedback on using RegRipper, sending sample hives, or just sending a simple ‘thank you’ helps to keep RegRipper going.  As to how many examiners use RegRipper…I’ve not met a person that hasn’t used it and not have it benefit a case.


轉自Regripper

Smile for the Camera

What's one of the new forensic artifacts a Kinect leaves on the Xbox 360 which may be beneficial to an investigation? Depending on the game or application using the Kinect, there could be photographic evidence and this evidence could be used to determine the person using Xbox, the other people in a room, or the state of a room over a period of time. 

The corporate environment doesn't deploy gaming systems to support the business so I won't come across the Kinect's photographic evidence until the technology has a business use for the Windows computer. The topic of this post is a little different than my usual content but there's a Kinect in my house and I wanted to find the photos or videos created by any of the Kinect games.


What is the Kinect?

The Kinect is a peripheral for the Xbox 360 and according to Microsoft it is a "controller-free gaming means full body play". The Kinect senses body movement and this movement lets people interact with the Xbox whether if it's playing a game or watching a movie. The Kinect was a Christmas present to my entire family and if you do your research on the games then it really does work as advertised.

I spike volleyballs by jumping in the air, my teenager scores goals by kicking a soccer ball, and my three year old runs in place while jumping over hurdles as he races down the track. Gaming systems have come a long way since my days of playing Contra and Super Mario Brothers using a controller with two buttons and a directional pad.

The Wired article How Motion Detection Works in Xbox Kinect describes the Kinect technology including the camera that's a part of the hardware. There are a few games that make use of the camera for entertainment purposes by providing slideshows of everyone who played the games. Certain games even store the captured pictures so people can access them at a later time.


Accessing the Multimedia the Xbox Way

Kinect Adventures comes bundled with the Kinect and this is one of the games which take pictures during game play. Kinect Adventures stores the pictures on the Xbox's hard drive and people can view the photos at a later time. The game's menu is used to access any of the created photos as opposed to the Xbox menu. The photos can be uploaded to websites and services such as Kinectshare.com. I uploaded a few Kinect Adventures photos to Kinectshare. The image below shows which games support Kinectshare and as you can see the Kinect Adventures game has uploaded photos (yup, that's my mug on the camera).


The pictures can be uploaded to Facebook, printed, or downloaded using Kinectshare. This is a downloaded picture with one of my sons.

Accessing the Multimedia the Post-mortem Way

An investigation may have some issues trying to use the photos or videos uploaded to Kinectshare. The first issue is Kinectshare uses the Windows Live ID associated with the Xbox live gamertag which will make it harder to access the uploaded files since the site is password protected. The second issue is the files are automatically deleted after 14 days which limits the timeframe of when the files can be accessed. Both of these issues can be avoided by directly accessing the Kinect multimedia stored on the Xbox's hard drive.

I mentioned previously I don't examine Xboxes but I was interested in the gaming photos. This post isn't intended to cover how to perform Xbox 360 examinations. If anyone is looking for this type of information there's a book called Xbox 360 Forensics published by Syngress (I came across this book while writing this post).

Right off the bat I found out that FTK imager and Encase don't display the partitions on the Xbox hard drive. A few quick Google searches not only provided me with a program to browse the hard drive but the searches also explained the folder structure. The folder structure stores content in a global area that applies to all users and content is stored in each user account's profile. The global area is located at /partition3/content/0000000000000000/TITLEID/OFFERID/ while the content in the user profiles are located at /partition3/content/PROFILEID/TITLEID/OFFERID/. The PROFILEID is the ID of the user account, the TITLEID is the name of game or application that created the folder, and the OFFERID is the type of content the folder stores. I used Kingla's Xbox 360 HDD Folder List website to determine the TITLEID and OFFERID. The picture below shows the global content for my Xbox and the Kinect games' folders are 4D5308ED (Kinect Adventures), 4D5308C9 (Kinect Sports), and 545607D3 (Dance Central).

The Kinect Adventures photos are located in the global folder 4D5308ED. There were two content folders with one for photos (OFFERID 000000001) and the other for videos (OFFERID 00090000). The videos folder didn't contain any videos of people playing the Kinect. However, there were numerous photos stored in the 000000001 folder as illustrated below.

The names of the files are based on the date and time of when they were created. It doesn't help much in my case since the Xbox's time was wrong. The files contain the Kinect Adventures photos as well as additional data. Examining the files I noticed some consistent file offsets containing data.

          * File offset 5778: name of the game and the data was K•i•n•e•c•t• •A•d•v•e•n•t•u•r•e•s
          * File offset 5914: PNG image and the image was an icon
          * File offset 22298: Same PNG image of an icon
          * File offset 49152: file name and the data was M9_0_2005_11_22_7_9_38_784
          * File offset 53328: JPG image which is the Kinect photo

I used a hex editor to copy out all of the data for the JPG image. As illustrated below the start of the JPG image is at file offset 53328.

The JPG data was copied and saved as a new file with a jpg file extension. The image was the Kinect photo showing my three year old playing Kinect Adventures while my teenager waits on the couch.

What's Next

Only certain games or applications create videos or photos with the Kinect. Kinect Adventures is one of the games that do and this game comes bundled with the Kinect. As I said before, this technology hasn't reached the corporate environment yet but I think it's only a matter of time before it does. A quick Google search provides a ton of hits of how various people adopted the Kinect technology for other uses including controlling a Windows 7 computer. Winrumors.com posted that Microsoft is going to be releasing its own Windows based Kinect SDK in the spring amid a growing community of "Kinect hackers". This could be the beginning of this technology extending beyond gaming and research to serve other purposes more suitable for the corporate environment. Time will tell what new forensic artifacts this technology will bring and how beneficial the artifacts are to an investigation.

「電腦處理個人資料保護法解釋彙編」電子檔

 「電腦處理個人資料保護法解釋彙編」電子檔

PDF格式,請自行下載檔案
檔案來源法務部全球資訊網

Memoryze: Missing Connections (Settled)

In my previous article, I said Memoryze missed TCP connections. Now, I've revalidated the fact.

First, I wrote new EnScript "ConnScan", for Windows 7 x86/x64. After I used some network applications (at the same time, I saved the result of netstat command), I acquired the memory image by using Moonsols Win64dd. The result is as below:

Ws000007
There was a broad distinction between the output of EnScript and Memoryze. For instance, EnScript (info inside red frame) extracted 3 connections used by Dropbox, but Memoryze (info inside blue frame) passed over all of them. I think this example is only a small part of the problem.

I recommend you validate the result by using multiple tools when analyzing RAM image. 


轉自 CCI

How to perform a forensic PC investigation

When you have a technical interest in Windows or PCs in general, there are few things as fascinating as a good computer forensics package. 


This is partly because they're an excellent way to check exactly how someone is using a computer – the files they're accessing, the websites they're viewing and any information they may be trying to hide. It's a little sneaky, but if you have suspicions that, for example, an employee is doing something they shouldn't on a work PC, then this could prove very useful.


However, forensics programs also offer many other applications. They can help you recover deleted files, uncover even the stealthiest of malware, troubleshoot all kinds of PC problems, learn more about how Windows and your applications work, and let you pretend you're in your hometown's own version of CSI – perhaps.


This normally comes at a huge cost, with the top forensics packages running to thousands of pounds, but now there's a rare exception. PassMark Software has released a beta of a new package, OSForensics, which you can download for free and use until July 2011. 

Despite being a beta, OSForensics is already fast, generally reliable, and packed with a host of useful features, so there's never been a better time to find out what forensics software can do for you.

Recent activity
Checking up on how other people are using your PC sounds a little morally dubious, but if you believe that they're engaged in activities you don't approve of – and maybe trying to hide them from you – then it seems to us that you're entitled to try to discover the truth. OSForensics can help you accomplish this in several ways.

Launch the program, taking care to give it administrator rights if you're running Windows Vista or 7 (right-click the shortcut and select 'Run as administrator'). Click the 'Recent activity' tab on the left-hand menu. 

Accept all the default settings for the time being, click 'Scan' and, after a moment, OSForensics will list details relating to websites you've visited, files you've downloaded, documents you've opened, USB flash drives that have been attached to your PC, wireless networks that you've accessed (if appropriate) and more.

Some of this information is available from other sources. It's not difficult to browse through your web browser's history, for example, or check any cookies that have been downloaded, but other details are more unusual. If you're investigating a work PC, for instance, you could view the USB details to see if someone may be attaching unauthorised drives, perhaps in order to steal data. 

Filter scan results
There's a definite advantage in having every detail available in a single interface though, and it's filterable, too. If you only want to look at the files that have been downloaded, for example, you can do this by selecting 'Downloads' from the 'Show Only' list. 

If you're only interested in the events of the last week, select 'Search date range only', change the 'From' and 'To' dates accordingly, and then scan your system again. 

If you click the 'Timeline' view, you'll see a classic timeline graph that enables you zoom in on a period of interest. You can click a year, a month or a day, then drill right down to the activities during that period. Right-click to export the results that interest you in CSV, HTML or TXT format.

The majority of forensic packages provide easy ways to search a hard drive beyond any system that might currently be installed (such as Windows Search), and OSForensics is no exception.
Click the 'Create index' tab, for instance, and you'll be able to choose a start folder that defines the file structure you'd like to search. Any subfolders will be included automatically, so to search the entire C: drive, you would simply specify 'C:\'.
It may take a very long time to index the whole drive, so if you only want to search for something in the Documents folder, browse to 'C:\Users\[Name]\My Documents' instead.


forensic search
SEE HERE: Thumbnail previews are available in searches, making it easy to find anyimages you need, such as photos you've deleted and want to restore

The indexing is tool is already comprehensive, but you can make it even more so with a few extra tweaks. Click 'Config', then select both 'Scan files with no extensions' and 'Scan files with unknown extensions' to try to uncover content that other tools might miss. Then choose 'Files and unallocated sectors' to look for content in files that may have been deleted. 

When you've finished, click 'Create index', then leave the program for a while. It will have to scan a huge number of files and the process will therefore take some time to complete.

It's worth the effort though, because when it's finished, you can use the 'Search index' tab to enter your key words and pull up matching files, images, emails and more almost immediately, including content that wouldn't necessarily be available if you used Windows search alone. 

Deleted files search
If you're especially interested in deleted files, there's no need to spend lots of time performing unallocated sector searches. Just click the 'Deleted files search' tab and you'll find that OSForensics comes packaged with its own easy to use, built-in undelete tool.

The tool may appear confusing at first, but is straightforward if you understand how it works. On our test PC, for instance, the deleted files search announced that it would, by default, search the disk '\\. \PhysicalDrive0' – which, if you're used to Windows drive letters, isn't exactly clear. 

It's not that bad, though. All '\\. \PhysicalDrive0' means is that the program will search all the partitions on your first physical drive, however many there may be. If you want to restrict your search to a particular partition, then select it from the list, which for us produced something like '\\. \PhysicalDrive0: Partition 0, C: [931.21GB NTFS'. Rather lengthy, but you'll know what it means.

When you're finished, click 'Search', and the program will produce a list of all the deleted files it's found almost instantly. If you know what you're looking for, enter all or a part of the file name in the 'Filter string' box, and click 'Apply filter' to display only matching files. (You can also filter by multiple file specifications if you separate them with semi-colons, such as '*.gif;*.xls'.)

forensic undelete
BACK FROM THE DEAD: A simple Undelete tool enables you to view and recover deleted files

What the report won't give you, unfortunately, is any preview thumbnails, so if you're looking for images then you won't be able to spot them at a glance. However, if you suspect you've found the right file, then OSForensics can usually display it for you. Simply right-click it, select 'View with internal viewer', and the program will display the image. Not the right one? Use the 'Back' and 'Forward' buttons to step through the list. 

When you've found what you need, right-click the file and use one of the 'Save' options to bring it back from the dead.

Signatures
One particularly interesting feature of OSForensics is its ability to create a signature of a particular set of files, folders, or an entire hard drive. You could create one signature now, for example, and another tomorrow, then use the program's 'Compare signature' option to show you everything that's been changed – that's new and modified files.

This clearly has all kinds of applications. You might use it to highlight changes another user has made to your PC. You could also compare signatures taken before and after installing an application to view the changes that it's made to your PC. 

What about creating a signature of your Windows folder, then looking for changes that could indicate malware? Then you might create a signature of your entire system partition every day, then compare it to the previous version and look for unusual activity – whether it's malware or just applications that are creating unnecessary files.

Whatever your reasons, this is definitely worth trying and is very easy to do. Just click 'Create signature', then specify the starting folder for whatever you'd like to scan (try an entire drive to begin with), and click 'Start'. The process only takes a few seconds to complete, and you can save the results to your desktop. 

Open a browser window and visit a site or two, then switch back to OSForensics and click 'Start' again to create a second signature of the same area. Finally, click 'Compare signature', point OSForensics to the two signature files and let it highlight the differences. 

It's quick, easy to use, and can be very informative.

Our favourite OSForensics feature, for its sheer originality, is the Mismatch File Search. The core idea is a simple one. All you have to do is point the program at a starting folder – 'C:\' , say – then click 'Scan'.
The program will begin to scan your files, looking for any where the content doesn't match the extension. This might uncover all kinds of odd behaviour. If another user of your PC has renamed some videos to have ZIP extensions, for example, then the Mismatch File Search will reveal what's going on. 

If a piece of malware has renamed key executables to an apparently harmless TXT extension, then again, this OSForensics report will highlight the change.

What's in a format
More generally, you'll discover the real file formats behind many of your applications. The program revealed that our old Empire Earth '.ee3sav' save game files were actually ZIP files, and that CyberLink's '.thl' files were PNG thumbnails – information that could come in very handy if these files were ever corrupted and we needed to make manual repairs.

In our experience, the file search can be an extremely revealing look at what's really going on with your PC. The same can be said of almost all of OSForensics' utilities – the program has many possible applications, and there's no telling what it might be able to do for you until you try it. 

So give it a try – download a copy, explore the functions and see what this excellent forensics package can uncover about your computer, its software and users. 


轉自http://www.techradar.com/news/computing/pc/how-to-perform-a-forensic-pc-investigation-923706?artc_pg=2

Awesome Duplicate Photo Finder 尋找重複照片的免費工具

下載點:Awesome Duplicate Photo Finder 免安裝版

使用教學
解壓後直接執行即可啟動該工具,在使用前建議先點擊「Settings」設定要讓該工具搜尋哪些格式的圖檔照片


接著我將該工具的基本介面說明如下(請自行對照下圖中的數字):
  1. 1 加入要搜尋照片的資料夾,自動支援子目錄
  2. 2 移除已加入的資料夾
  3. 3 向上移動已加入的資料夾
  4. 4 向下移動已加入的資料夾
  5. 5 清空所有加入的資料夾
  6. 6 Start Search:開始搜尋重複圖片
因此,想要比對照片的話,基本步驟就是加入想要比較的資料夾,然後按「Start Search」即可


搜尋過程的畫面如下,在這個畫面中我們可以知道目前總共搜尋了多了張圖片,找到了多少張類似的照片及所費花的時間,想要停止比較的話按「Stop Search」即可


當比較完成後,該軟體會顯示最終的結果,並把重複的照片陳列在視窗下方


建議要刪除圖片的時候,可以透過下方的「Similarity」來排序相似度,數字越大表示相似度越高,而當你點擊某一重複圖檔時,中間畫面也會即時預覽該圖片,並將雙方的解析度、大小列出,方便你判斷該刪除哪一個檔案。


這套軟體並不會自動標示建議刪除的圖片,所以必需手動一個一個判斷,這也是該工具日後可以加強的地方。


轉自靖 ● 技場